
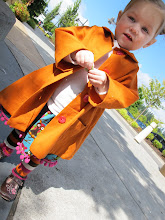
They're called leggies in our house. A wardrobe staple. Something about living in the northwest where layered clothing is a necessity.
Also: scrumptious and adorable.

I made a sizeable investment in Babylegs, our legging of choice, before Bean was born. And afterward, as my pattern-crazy heart took over the purchases with WE MUST HAVE THESE, I was easily able to justify the cost. Babylegs: one of the best investments you can make in your child's wardrobe.
She has worn them for two years and she's still wearing them. You can't say that about any other article of clothing.
But as much as I love the Babylegs (LOVE is too calm a word... there is OBSESSION there, really)---- for the everyday use and the near constant desire for new patterns and colors, one must get a little creative.
So why, you might ask, is Whimsy throwing her hat into the already-crowded leggie tutorial arena?
. Because there's this one step that is somewhat confusing in the tutorials, and it SCARED ME FROM MAKING THEM for a good long while.
. Because they are so deceptively simple that any one of you can make them. Yes you. YOU can make them.
. Because I got a few pairs of $2 socks from Target and wanted to make some more.
and this: . Because I have a secondary leggie tutorial that is EASIER and will show you how to make RUFFLED LEGGIES, which might actually send you into a Cuteness Coma. Really.
So first - the basic leggie tute.
And here I will offer the first-of-many disclaimers over the scarred state of my studio table. It bears the marks of love and bears them well.
Step one.
You will need the following ingredients: a pair of adult knee socks, a sewing machine, some sharp scissors, thread. (Uh. I just pictured the knee socks.)

Step two.
Lay the socks out on your battle-scarred table. If they are striped, make sure the stripes are all lined up and such. Once they are all straight and ready to go, cut off the feet of the socks, as shown.


Step three.
Do not throw the feet away. Put those feet in front of you and cut off the toes and the heel, leaving a little cylinder of sock.

The little sock cylinder, about 3 inches long.

Here is the little cylinder again. Notice that it is now turned long-ways.

Step four.
I'm being painstakingly careful here because this was the part that confused me originally. So here we are again, looking at the long-ways cylinders. You are going to trim off a little bit from each of them. Like this.

This is going to eventually become the leggie cuff. You'll see what I mean in a minute.
Step five.
Turn the clipped cylinder bits right-sides together. They'll look like this, though you don't have to pin them if you don't want to (I usually don't).

Step six.
Using a straight stitch, sew up the little cylinders, making them skinnier cylinders. (Note: you don't have to use zig zag or an overlock stitch - straight stitch works just fine for this.)

When you're done, you'll have two of these.

Now you'll fold the wrong sides together and admire your two little cuff thingies (that's the technical term).

Step seven.
Put the cuff thingies aside and pick up the long tubes. Turn them both inside out.

To help you understand this next step, look at this. Here is the long tube sitting up against the little cuff. As you can see, the cuff is smaller in diameter than your tube. This is so the leggies won't bunch around your little one's ankles. In order to sew the cuffs onto the leggies, you'll need to pin them together.

Step eight.
Stick the cuff down the tube.

Because the cuff is smaller than the tube, you'll pin them together in a couple of places.

Step nine.
Now you're going to sew the cuff-and-tube together using a simple straight stitch. As you sew, you'll stretch the cuff part to meet the tube part ---- as you go. Much easier than I'm making it sound.

Step ten.
Once you've finished sewing around, you'll have some raw edges like this. You can trim them up a little.

Look what you made:

When you turn them right-side out you'll have a pair of adorable leggies.

Part Two:
Now that you've done the regular version, how about some SCRUMPTIOUS RUFFLED LEGGIES? (Also, have I mentioned, easier?)


Step one.
You'll need a pair of adult knee socks, a sewing machine, thread, and scissors.
Step two.
Cut off the feet and discard. You won't need the feet at all.
Step three.
Turn the tubes inside out.
Here are the raw edges of the tubes. You'll be sewing directly on to the raw edges with your sewing machine.
Step four.
You'll need to know your sewing machine for this step. Mine has a stitch that is similar to serge, and that's the one that I use (notice the funny triangle button that's lit up in the picture--- that's the stitch I use). But you can use a zig-zag instead. Adjust your stitch length setting so that the stitches are close together. Not an exact science, but you'll want them a couple of millimeters apart (or so).
Also make sure you're using thread that matches the color of your leggies.
Step five.
Visualize the way a zig zag stitch works: going from left to right. You will be sewing directly on the raw edge of each leggy, so that one side of the stitch (left) is on the leggy, and the other side of the stitch (right) actually goes just beyond the fabric. And as you sew, you will S-T-R-E-T-C-H the fabric as much as possible. The more you stretch, the more ruffled the edge will be.
Continue to stretch and sew until you get to where you started. Repeat on the other leggy.
Trim the thread bits and you're done.

Look at that cuteness!

Tune in for the rest of this week-long craft tutorial madness. And if you have any questions or requests for future tutorials, let me know.

11 comments:
Cute! Could we get a picture of the Bean wearing some ruffly leggings so we can see what that looks like? I've always loved seeing her wear those cute little leggings. Now I want to watch for sales on socks! :)
Also, for the ruffled leggings, you could "surge" the edge so you have a no-show sock, couldn't you?
I love your craftiness! I read the whole post twice, just to make sure I understood what to do even though I don't have (a) a sewing machine; (b) a little girl who needs leggings; or (c) the ability to be crafty. Which brings me to my next point: what about boys? What can we make for little boys? A cape? A tie? Can we have a boy tutorial one day?
I love the leggies. And I love the word "leggies" even more than that.
I do not have a sewing machine, and I do not even know what the word "serge" means. (Although I WOULD like to learn to sew, I'm just too scared, as it seems too big an undertaking.) You do make it look easy, though, Whimsy. Bless you.
Rose: Yes, you can use a serger for both of the legging options. The key to the ruffle on option 2 is to STRETCH the fabric as much as possible. And I'll see what I can do about getting a picture up of Bean wearing the ruffled leggies. She was surprisingly uncooperative this weekend.
Eleanor Q: I've got something coming up on Wednesday that will work PERFECTLY for boys **and** girls! And while I might not get to it this week, I have a couple of other tutorials for boys up my sleeves.
Wow, you are really an excellent seamstress! I'm impressed!! and the leggies are soooo cute, too. This is a great post!
I love the leggies! Now, I only need to have a little girl to dress up. I'll cross my fingers for when we have our next baby whenever that may be. But, I'm excited about your craft week and the upcoming ideas. You are too creative!
If only I weren't desperately fearful of sewing machines...
Oh wow. Its rare that something that cute can be so easy to make. Even I might be able to pull it off. I'm excited. Thanks!
Great job. You should do more tutorials as you really explained things really well.
Awesome! Who needs Baby Legs (TM, I'm sure)!
I don't think Z would go for these but I think they'd be perfect for E this summer, crawling around, knees covered. Hmmm..... maybe I can add a little padding in the knees...
I just made these! They are sooooo easy and look fab! Many thanks!
Post a Comment