
It is my own personal opinion that every child needs a super alter ego. A cape to don, a special insignia--- something to show that this child is special. Super even.
As they are.
This particular tutorial came about because Clueless But Hopeful Mama asked for ideas to expand a dress-up box.
I considered tutus (which are awesome and very easy to do WITHOUT A SEWING MACHINE, y'all).
Chef garb.
Some fancy clothes.
But none of them really grabbed me.
You know what grabbed me? Thinking about Bean as she will be in a few years, when she can't get enough of sparkly pink princess junk and it is All Royal All the Time. I am not going to tell her she can't live and breathe the fuschia glitter.
But I am going to try to offer her as many options as possible. See if she'll be interested in trading the tiara for a cape. At least occasionally.
Here's hoping.
How to Make a Superhero Costume: the Whimsy Tutorial

First: THE SPECIAL SHIRT.
Step 1.
For the ingredients you'll need a child's shirt (preferably white), some fun fabric, scissors, two 1-inch pieces of white velcro (or the color to match your shirt, i.e. black for black, etc.), an iron, an ironing board, and double-sided fusible web (found in your local fabric store).

Step 2.
Trace the outline of a letter - this is the letter that will go on your child's insignia shirt. I chose A for Alice, but you can do whatever strikes your fancy, of course. You could also do a simple shape in place of a letter, like a star or lightening bolt. Once you've traced the letter, cut it out.

Step 3.
Familiarize yourself with the fusible web. The webbing itself is sandwiched between two sheets of paper. One piece is easily removeable, the other is not. Make sure you're tracing on the paper that is NOT easily removeable during this step. Take the fusible web (the not-easily removeable paper side facing UP) and your letter/symbol. Flip the letter/symbol over so it is backwards and then trace it onto the fusible web.

Step 4.
Cut out the fusible web-traced shape (loosely cut out, as you can see - don't cut on the lines yet). Also take your cute fabric. Flip the fabric over so the wrong side is facing up. Remove the easily-removeable paper from the fusible web to reveal a slightly sticky substance. Now press the web to the wrong side of your fabric. Run your hand over it a little so it sticks.

Step 5.
Cut out your shape (you now have a fusible web/fabric sandwich). As you can see, there are some frayed edges here because my shape is very curvey. The more straight edges your shape has, the less frayed edges. But I don't think it's a big deal either way - you can trim them at the end.

Step 6.
Here are both of my shapes. I'm an overachiever and so I am doing a multi-layered design (lightening bolt on bottom, letter on top).

Step 7.
Have your shirt ready to go on the ironing board. Position your shape on the shirt, but remember: you still have that other piece of paper backing on the shape, so it's not going to stick. Yet. Once you're happy with the position of the shape on the shirt, remove the paper backing and then stick the shape down on the shirt.

Step 8.
Using an iron set on the highest setting suggested for the garment (in this case my shirt is cotton so it's set as high as it can go) - WITH steam, iron over the shape and the shirt. You'll iron over it for 20 seconds or so. You don't have to press extra hard or anything, just iron for 20 seconds and then you're done with the applique. As you can see with mine, I did the lightening bolt first and then the letter.


Step 9.
Place your shirt on your work surface and look at the front of it (ignore the ruler in this picture). You will be sewing two pieces of velcro on to the shoulders of the shirt. Make sure you use the SOFT side of the velcro for both shoulders - the scratchy part will be going on the cape.


As you can see, this is why it's important for the velcro and shirt to match - white on white allows the child to wear the shirt without the cape, if he or she so chooses.

The finished shirt with velcro attached. The next time I do this, I'm going to move the velcro forward a little bit more toward the front of the shirt. It's still fine, but I think having it moved closer to the front will make the cape a little more cape-y, if you get my meaning.

Second: THE CAPE.
Step 1.
Cape ingredients: 2/3 of a yard of fabric (I actually used part of a sheet I found on clearance ages ago), the other sides of the velcro tabs (scratchy sides), sewing machine, iron & ironing board.

Step 2.
Cut your fabric. Width: 20 inches. Length: about 8 inches shorter than the child's height (in my case, I just measured the distance from Bean's shoulders to the tops of her shoes - I didn't want the cape to be skimming the ground). You can make the cape wider if the child is older - it's a pretty flexible size so I doubt you could do this too wrong by playing with the size a bit.
Cut your fabric. Width: 20 inches. Length: about 8 inches shorter than the child's height (in my case, I just measured the distance from Bean's shoulders to the tops of her shoes - I didn't want the cape to be skimming the ground). You can make the cape wider if the child is older - it's a pretty flexible size so I doubt you could do this too wrong by playing with the size a bit.

Step 3.
Using your iron, you will create a hem along three sides of the cape: the two long sides and one of the short sides. I did about a 1/2 inch hem, but again--- you can play with this. Nothing is set in stone. Once you've ironed the hem, sew it up. You will have one raw edge on the second unhemmed short side.


Step 4.
The unhemmed short side will be the top of the cape. This is going to be gathered. To make a gather, you simply sew a straight stitch along the edge, about 1/4 inch in. Leave the long tails of the thread at the beginning and the end of your line of stitching.

Step 5.
Now you're going to pull the fabric along the strings very gently, creating a gather. I purposely left both sides closest to the edges ungathered.

Step 6.
Remember this picture of the shirt? You will want to measure the distance from one piece of velcro to the other - essentially finding out how wide your cape should be at the top. In my case, this was 9 inches. I made sure to gather the cape to be 9 inches wide.

Step 7.
Put the cape aside and pick up your piece of cape fabric again (whatever is left). Cut a piece of it 2 inches longer than the width of your cape (that measurement you took between the velcro), and about 4 inches wide. This is going to be a little hem casing for the top of the cape, to cover over the gathered bits.

Step 8.
Using your iron, you'll iron the piece of hem casing in half lengthwise, then unfold it. Then fold up the bottom portion and iron it. Then fold down the top portion and iron it until you have a finished piece of hem casing. Notice that one side of the hem casing is slightly wider than the other - this is done on purpose, to make it easier to sew everything together.


Step 9.
Open up the hem casing and put the gathered side of your cape in it. Treat this step like you're wrapping a present. You'll want to tuck in the ends of the casing on both sides of the cape - do it any way it will work for you, there really isn't a right or wrong way. I trimmed up some bits of it to make this easier. Pin everything in place.


Step 10.
Sew it all up.


Step 11.
Place your two scratchy velcro pieces on both ends of the cape top. Sew them on.

Third: PUTTING THEM TOGETHER.
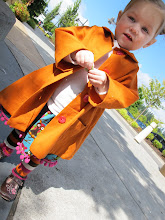
This is super easy: you just stick the cape on to the velcro bits on the shirt and GO.

Flying optional.
Flying optional.

9 comments:
I might be able to do the letter on the shirt part. If you make my letter for me, that is. :)
Can you still tell us how to do a tutu WITHOUT a sewing machine? Some day....
Super Alice is all shades of awesome!
This is SUPERGENIUS!
I'm kinda loving the use of SUPER in the comments. I think it is super.
Shelly: Yes, you can totally do the shirt with insignia so easily - and for the letter, just use a font on your computer, expanded to a nice ginormous size, then print it out and cut it out. Easy!
I'll post some tutu links soon. Totally no sew and they look fantastic.
I want tutu links tootoo.
Anneke takes classes at the Art School of the Austin Museum of Art. They have a class called Super Me! for 4- to 5-year olds in which the kids create their own SUPERHERO identities, complete with cape. Yours is much more involved. And cuter.
Oooh, I'm really liking the letter shirt. I'm already thinking about pattern/color combinations. Great idea!
SUPER FANTASTIC! Alice is the cutest superhero girl ever!
I am SUPER excited to try this! There are so many fun projects to try! WHERE TO START?!?!
SUPER ZOE coming soon!
Love it.
Thank you for shopping at Superhero costumes. Superhero costumes offer the largest variety of officially licensed Superhero costumes on the Internet. Superhero costumes carry the popular Super Hero costumes like Batman, Superman and Spiderman as well as the obscure costumes like The Flash and Green Lantern.
Post a Comment